Import a bank statement: send the file straight from your banking app
Your bank already knows everything you spent: the date, the amount, the shop. Typing it all into an app again is wasted work. Take a statement for the month and hand it over. The shortest way is not to save the file anywhere: in your banking app tap Share and pick FinLad. The statement opens on the import screen. The app sorts out the columns, shows you exactly what it is about to record, marks anything you already have, and writes nothing until you say yes.
Author: Oleksii Itseksonthe developer of FinLad, and its user since 2025
Published: Updated:
How it works
- 1
Export the statement in your banking app. Look for «Statement», «Report for a period» or «Export transactions», choose the dates and the format: CSV, Excel or PDF. It is the same statement you would get for a visa or an accountant, nothing special to ask for. A month or two at a time is a comfortable size.
- 2
Do not save the file. Tap Share and pick FinLad. Your phone shows the list of apps, and we are already in it. The statement opens on the import screen at once, with no hunting through folders. If the statement came in a messenger or by email, the same Share or «Open with» is there too. And if you prefer the long way, the import lives under More, then Import a statement, with a Choose file button.
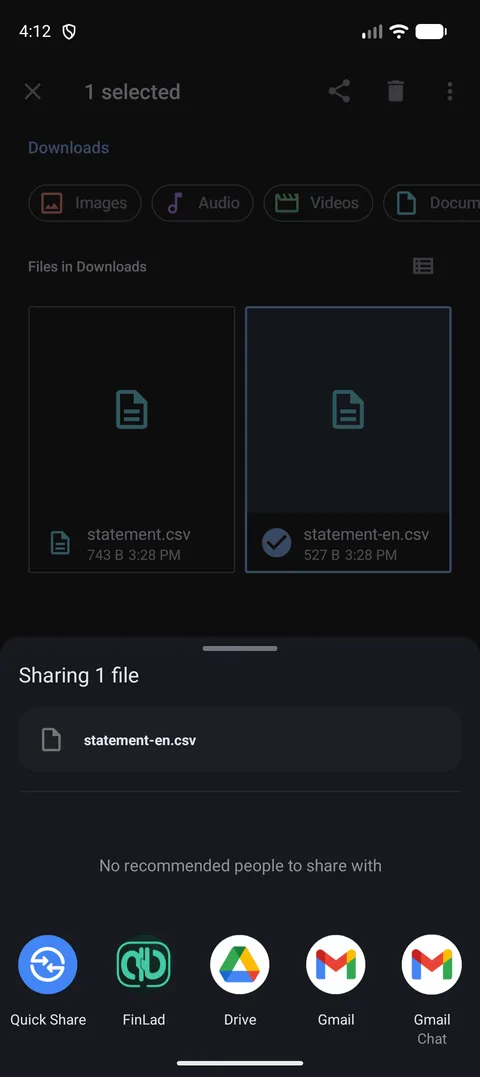
The same sheet you share a photo with. The file is never saved anywhere. It goes straight into the app. 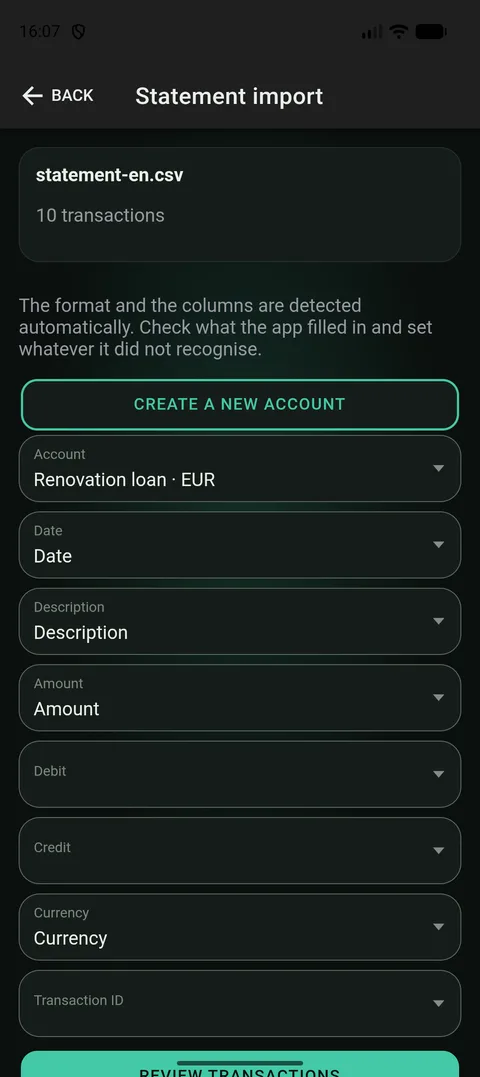
The file is already here. No folders to walk through. - 3
Choose the account the statement belongs to, the one the money actually left: a card, a current account, a currency account. If that account is not in the app yet, you can create it right here without leaving the import.
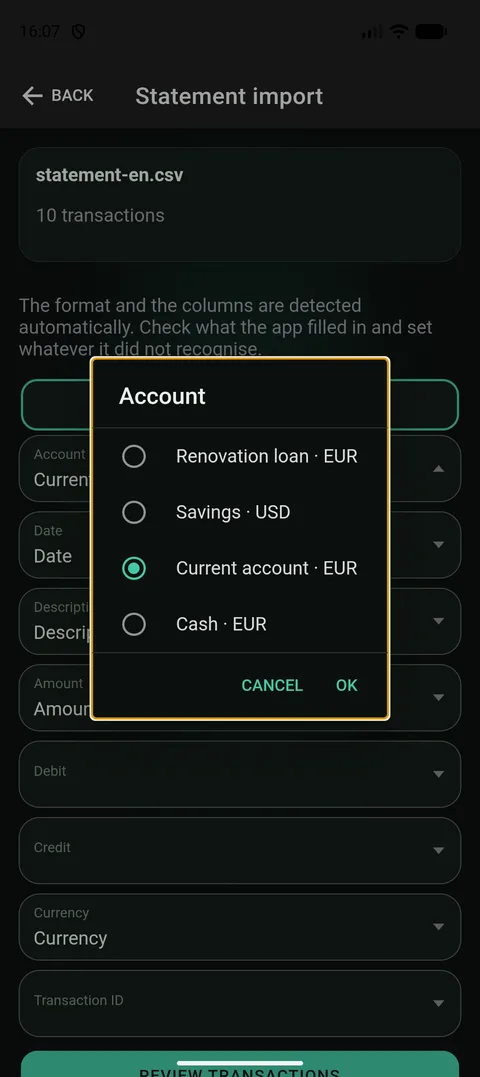
The account can be created right here if that card is not in the app yet. - 4
Look at the columns. The app works out the format on its own, finds the date, the amount, the description and the currency, and fills them in. Your job is to check whether it guessed right and fix what it did not. Next month, for a file of the same shape, it will not ask: it remembers the layout.
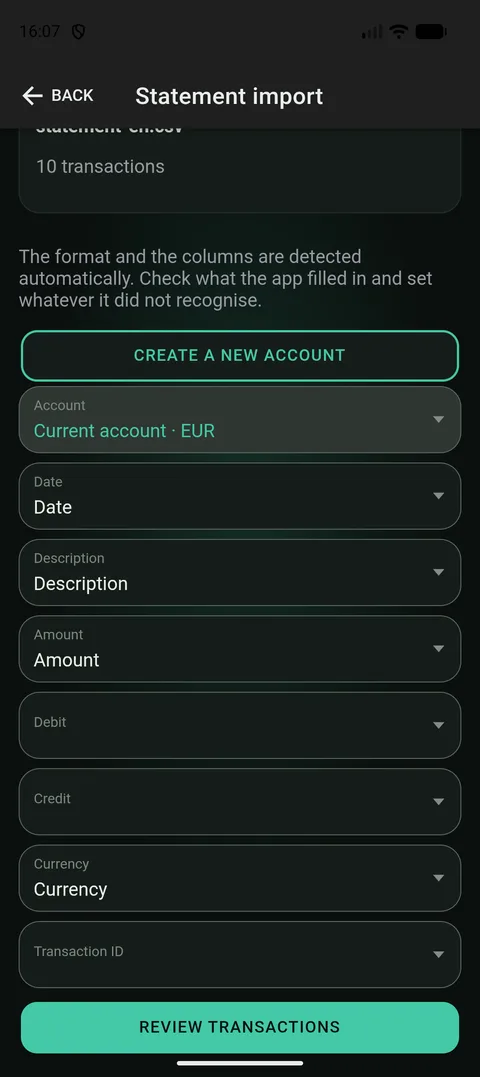
The app fills this in itself. Next month, for the same file, it will not ask again. - 5
Go through the transactions before they become records. The app shows the whole list and marks the rows itself: «Already imported», «Possible duplicate», «Looks like a transfer between your own accounts», a cash withdrawal. The decision is yours, row by row: merge, skip, or keep both.
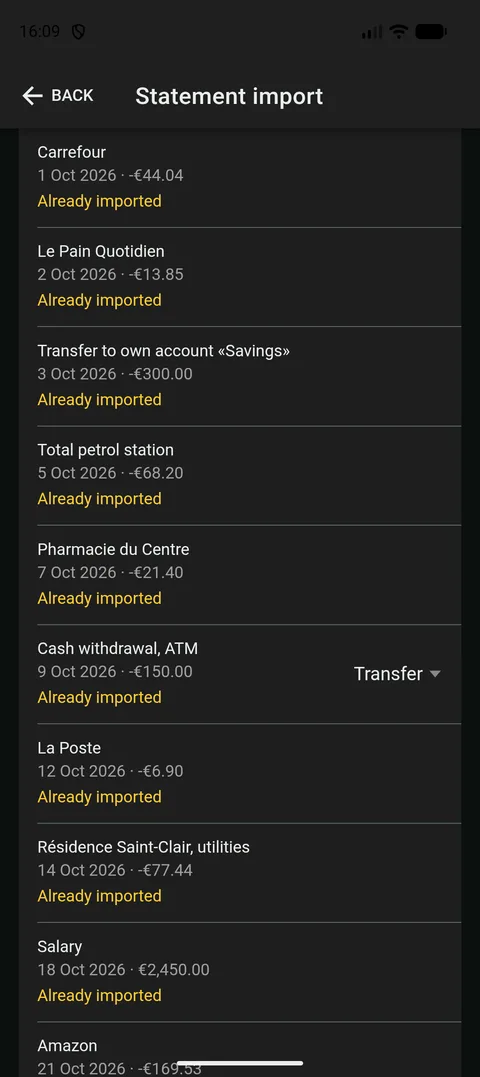
Until you confirm, not a single record appears in your history. - 6
Say how much money is in the account now, and tap Import. A statement is a slice of history, not the whole life of the account, so the app cannot know what the account started from. Enter the balance your bank shows today and it works the opening balance out itself. After that the transactions appear in your list.
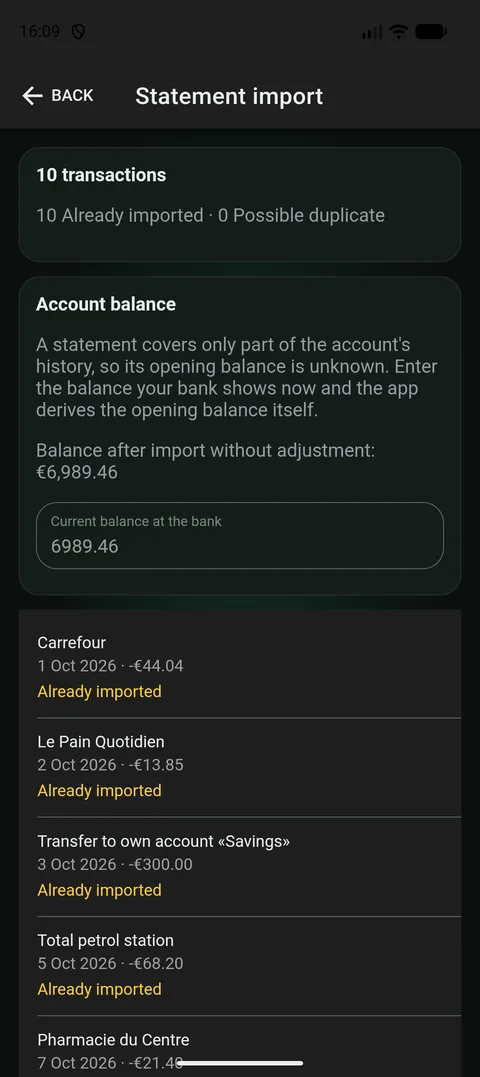
One figure, and the app squares up the history the statement does not contain.
The short way: share it straight from the bank
The usual path is long: save the file, remember where it landed, open the app, find the import, tap «Choose file», walk through the folders. Half the people give up somewhere in the middle.
So the app accepts a statement from the same share sheet you use for a photo or a link. In your banking app: Share. In the list: FinLad. The file does not have to be put anywhere. It opens on the import screen at once, with the number of transactions already counted.
A statement that arrived in a messenger or by email works the same way. Without downloading anything, tap Share or «Open with» and pick the app. If the phone was locked, the familiar PIN screen comes first and the file waits for you: a stranger cannot push anything into your records without the code.
Today this works on Android. On an iPhone the path is still the ordinary one: save the file to Files or iCloud Drive and tap Choose file in the app. Everything after that is the same.
Which files work, and which do not
- CSV is the simplest and the most reliable. It is a table saved as plain text, and nearly every bank can produce one.
- Excel (.xlsx) is a table too. If your statement lives in Google Sheets, choose «File → Download → Microsoft Excel» and share what comes out.
- PDF works when the text in it can be selected. A statement the bank itself produced is like that, even with an electronic signature on it. A scan or a photo of a paper statement is not: there is no text in it, only a picture. The app says so and asks for CSV or Excel instead.
- What will not work: a screenshot of the transaction list, the old .xls format, an archive. The app sees this straight away, on the phone, and says so, rather than sending the file off somewhere and going quiet.
- The size limit is 5 MB. That is a lot: a year of transactions in CSV is usually a few hundred kilobytes. If the file is bigger, export a shorter period.
Why nothing ends up doubled
The biggest fear about importing is that the same purchase lands twice: once from the statement, once typed by hand. So the app looks at every row and compares it with what you already have: the amount, the date, the account.
A row that is certainly already there is marked «Already imported» and skipped by default. A row that resembles an expense you typed is marked «Possible duplicate», and you choose: Merge (one record remains, with the bank’s own details), Skip, or Keep both if they really were two different purchases.
The same statement can be imported again as many times as you like: every row will come back marked as already there. And when two months overlap, because December was downloaded twice, the app recognises the shared days.
Pending holds, transfers and cash
A card statement often carries a second list: amounts the bank has held but not settled yet. In a day or two they appear among the ordinary transactions. Record them now and every purchase is counted twice. So the app sets them aside, counts how many there are and what they add up to, and says so in its own line. Want them anyway? There is a tick box for that.
A transfer between your own accounts looks like two separate transactions in a statement: it left here, it arrived there. The app spots that pair and offers to count it as a transfer rather than an expense. The money did not disappear, it moved. You can point at the other side by hand if it was not found automatically.
A cash withdrawal is not an expense either. The money moved from the card into your pocket. The app offers to create a «Cash» account and record a transfer into it. The expenses are then the purchases you record out of that pocket.
When the figures do not add up
A statement usually prints the balance after every transaction. The app adds the rows up and checks itself against that column. If the sum of the rows and the balance disagree, it says so plainly: the rows explain this much, the statement says that much, and here is the difference.
It happens, and it is almost never a reading mistake. It is usually the bank not printing some operation as a row although its balance accounts for it. The app does not hide the difference and does not quietly patch it. It names it and lets you import anyway.
Currency works the same way. If a row is in dollars and the account is in hryvnia, the app does not decide for you: it asks whether to leave the row out or to convert it at the day’s rate. The app knows six currencies: hryvnia, dollar, euro, pound, zloty and koruna. A statement in any other currency cannot be imported yet, and the app says so.
Categories come with the rows
An imported row is not just a date and an amount. The app gives it a category from the shop’s name: a supermarket is groceries, a taxi is transport. It already knows the common names, and if your bank prints a merchant code next to each row, it uses that too.
Your own corrections count most. Change the category on one imported row and the app remembers: next month the same shop lands in the right place on its own. Those rules are yours to see and edit, under the category itself.
Rows the name does not explain can be sorted by AI, if AI is switched on in your settings. Otherwise they arrive without a category and wait for you.
Where your file goes while this happens
A statement is a private document: your purchases, your places, your amounts. So one plain thing is worth knowing. If sync is on, the file goes to our server for as long as it takes to read it, and comes back as parsed rows. We do not keep the file.
If sync is off, the app says so on the import screen and reads the file on the phone itself. It goes nowhere at all. The transactions appear at once and stay with you until you turn sync back on.
If your records are encrypted, the server cannot see your amounts, so it cannot check a transfer pair for you. Such a row is imported as an ordinary transaction, and you link the transfer by hand in the app.
One more thing: the column names you confirmed are remembered on the phone, so next month it does not have to ask again. That is a couple of words like «date» and «amount», none of your transactions.
A statement, or a connected bank
If your bank is Monobank, a connection lives separately and works better: transactions arrive on their own, at the moment of purchase, and there is no statement to download. That is the Connect Monobank screen.
For every other bank, the statement is the way. Once a month, when the bill has arrived anyway, it is a minute of work. Some people do it weekly, and that is fine too: importing again doubles nothing.
The two do not conflict. You can have Monobank connected and import the statement of a salary card from another bank beside it. Each account lives its own life.
Which plan you need
Statement import is part of Plus. It works during the trial too, with a cap on the total number of rows. The app says how many are already used and how many are left before it writes anything. On the free plan the import screen says so honestly and up front, rather than after you have chosen a file.
Worth knowing
- Nothing is written until you tap Import. Up to that moment everything you see is a preview.
- If the columns were read wrong, fix them in the layout and the preview recalculates. You do not have to go back and choose the file again.
- A statement can be imported in pieces, a month at a time. The app recognises the overlapping days at the seam and does not double them.
- The account the statement goes into does not have to be empty. Records you typed stay where they are, and statement rows that resemble them are marked.
- The app does not ask which bank the file came from. It looks at the file itself. A statement from a bank we have never seen reads just as well.